
Custom Resolution Utility (CRU) is an EDID editor that focuses on custom resolutions. CRU shows you how the monitor defines resolutions and other capabilities and gives you the power to change it.
Add custom resolutions, remove unwanted resolutions, edit FreeSync ranges, and more. CRU creates software EDID overrides in the registry and does not modify the hardware.
Introduction
Custom Resolution Utility (CRU) is a powerful and versatile tool designed to enhance your computing experience by enabling the creation of custom display resolutions. This utility is particularly beneficial for users with NVIDIA and AMD graphics cards, offering a broad compatibility range. CRU stands out by allowing you to directly edit Extended Display Identification Data (EDID), thereby overriding registry settings for your monitor and introducing new resolutions to both primary and secondary displays connected to your system.
One of the key features of CRU is its EDID editing capability, which focuses on custom resolutions. This function allows you to see how your monitor defines resolutions and other capabilities, providing you with the flexibility to modify them according to your needs. With CRU, you can add new resolutions, eliminate unwanted ones, and even adjust FreeSync ranges, enhancing your display’s performance and compatibility.
CRU is characterized by its user-friendly interface and ease of use. To create a custom resolution, you simply need to download and install the utility from a reliable source, launch it, and input your desired resolution and refresh rate. It’s important to ensure that the values you input are supported by both your graphics card and monitor to avoid any compatibility issues.
Furthermore, CRU is a small, freeware utility that doesn’t require installation, making it a portable solution for on-the-go adjustments. You can run CRU directly from a storage device, offering convenience and flexibility for users who require display customization across different systems.
By creating EDID overrides directly in the registry and bypassing the need for inf file manipulations, CRU simplifies the process of defining custom resolutions. It’s capable of adding new monitor resolutions that can be scaled up from lower resolutions, providing a range of options for optimizing your display settings.
Features
- Custom Resolution Settings: Easily adjust resolutions beyond standard limitations.
- Refresh Rate Optimization: Fine-tune refresh rates for smoother gameplay.
- Detailed Color Adjustments: Enhance color depth and range for vivid visuals.
- Multi-Monitor Support: Configure settings for multiple displays effortlessly.
- User-Friendly Interface: Intuitive design for seamless navigation and adjustments.
- AMD/ATI’s driver also listens to the TMDS clock limit in the HDMI support data block.
- HDMI is treated as single-link DVI unless an HDMI support data block is defined in the first extension block.
- HDMI limits depend on the graphics card.
- Passive DisplayPort to HDMI adapters are limited to 165 MHz unless the driver is patched.
- The first detailed resolution is considered the preferred or native resolution.
Requirement
- Windows Vista or later (Windows XP does not support EDID overrides)
- AMD/ATI or NVIDIA GPU with appropriate driver installed (Microsoft Basic Display Adapter driver does not support EDID overrides)
- Intel GPUs and laptops with switchable graphics are supported with one of these drivers:
- Newer Intel GPUs are supported with the latest drivers.
- 6th generation (Skylake): Intel Graphics Driver for Windows [15.45]
- 4th/5th generation (Haswell/Broadwell): Intel Graphics Driver for Windows [15.40]
- 4th generation (Haswell) for Windows 7/8.1: Intel Graphics Driver for Windows 7/8.1 [15.36]
- Older Intel GPUs are supported for external displays only using the alternative method described below.
Before making any changes, familiarize yourself with getting into safe mode using a recovery drive in case you can’t see the screen. If you don’t have a recovery drive, press and hold the power button to shut off the computer while Windows is booting. Doing this twice should give you recovery options that you can use to get into safe mode: Troubleshoot > Advanced options > Startup Settings > Restart
Download Custom Resolution Utility
Experience unparalleled control over your display settings with our Custom Resolution Utility. Meticulously designed for both novice and expert users, this tool offers seamless customization of screen resolutions, ensuring optimal display performance. Our utility is rigorously tested and continuously updated to maintain compatibility with the latest hardware and operating systems. Download now to unlock advanced features and elevate your visual experience. Trust in our commitment to excellence and user satisfaction. Click ‘Download’ to start enhancing your display capabilities with confidence and precision.
| File Name | cru-1.5.3.zip |
| File Size | 532 Kb |
| Version | 1.5.3 [Latest] |
| Developer | ToastyX |
| Last Update | August 24, 2025 |
Getting started
- Run CRU.exe. A UAC prompt may appear because it needs permission to access the registry.
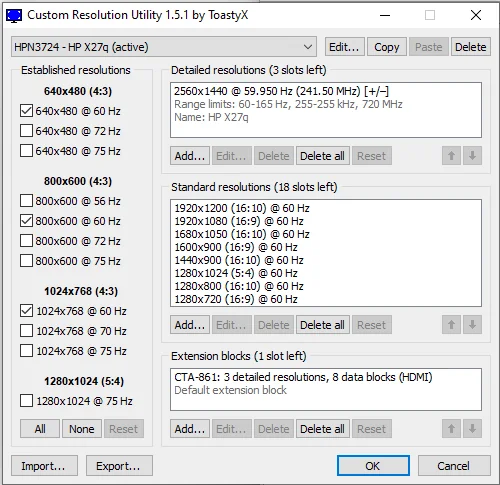
- Choose a display from the drop-down list.
- “(active)” means the display is connected and recognized by the graphics driver.
- “*” means changes were made and an override was saved in the registry.
- Edit the configuration as desired. Please read the sections below for more information.
- Repeat steps 2-3 for other displays if required.
- The “Copy” and “Paste” buttons at the top can be used to copy the resolutions, extension blocks, and range limits if included. It will not copy the name or serial number, but it will copy the inclusion of these items using the display’s own information. Import follows the same logic unless “Import complete EDID” is selected.
- Click “OK” to save the changes.
- Run restart.exe to restart the graphics driver.
- If the display does not return after 15 seconds, press F8 for recovery mode. This will temporarily unload all the EDID overrides without deleting them. Restart the driver again to reload any changes.
- On some systems, the graphics driver might crash while restarting. If that happens, the driver might be disabled after rebooting. Simply run restart.exe again to enable the driver.
- Set the resolution in the Windows display settings. To set the refresh rate:
- Windows 10: right-click on the desktop > Display settings > Advanced display settings > Display adapter properties > Monitor tab
- Windows Vista/7/8/8.1: right-click on the desktop > Screen resolution > Advanced settings > Monitor tab
To reset a display back to the default configuration, use the “Delete” button at the top to delete the override from the registry and reboot. To reset all displays, run reset-all.exe and reboot. This can be done in safe mode if necessary.